Saturday 23 April 2011

Jokaero Weaponsmith

230420116472204201164122042011639220420116382204201163322042011632
220420116312204201162822042011626

Jokaero Weaponsmith, a set on Flickr.

Via Flickr:
My stepson, Mikey has just won first prize in his age group (under 16s) for this paintup of the new Jokaero Weaponsmith from the Grey Knights set. Well done kid!

Inquisitor Coteaz Paint-up

Inquisitor Coteaz Paint-up 1Inquisitor Coteaz Paint-up 2Inquisitor Coteaz Paint-up 3Inquisitor Coteaz Paint-up 4Inquisitor Coteaz Paint-up 5Inquisitor Coteaz Paint-up 6
Inquisitor Coteaz Paint-up 7Inquisitor Coteaz Paint-up 8Inquisitor Coteaz Paint-Up 9Inquisitor Coteaz WIP 10Inquisitor Coteaz WIP 13Inquisitor Coteaz WIP 12
Inquisitor Coteaz WIP 11Inquisitor Coteaz WIP - Finished in Cabinet

Inquisitor Coteaz Paint-up, a set on Flickr.

Via Flickr:
Step-by-step as I paint GW Grey Knights HQ figure

Sunday 17 April 2011

The Art of Pinning

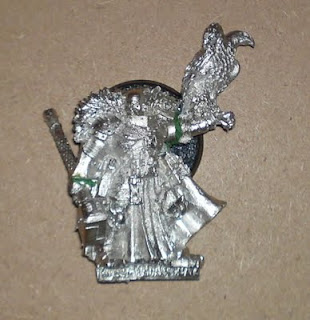
Coteaz temporarily held together 


Grey Knights HQ model - Inquisitor Coteaz will make a great subject for pinning. He only has 2 fixing points for drilling and glue, and they're both quite small.

If you're new to working with metal, you have probably never had to worry about bits falling off after you've painted them. Believe me, it's a real pain, and can get pretty messy - often ruining hours of hard work previously spent painting.

Normal plastic glues work by melting the surfaces of the joining parts, and when it's dry, they're stuck together. Metal doesn't behave in quite the same way. Super glues are mostly useless and even 2-part epoxies aren't always successful. This is because the mating surfaces are smooth, non-porous, and provide no gripping point for the adhesives.

This is where you'll want to employ the technique known as pinning.

Get a box of paperclips, a pin-vise and a set of micro drills. I'm using a 0.75mm bit to dill these holes.


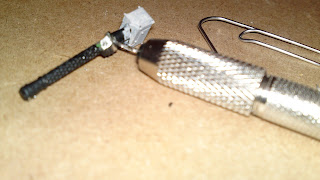
Pin vise, paperclip and hole drilled
A fresh drill bit will bore through white metal with ease. A more well-used bit will take some effort. Blunt bits don't cut well.

With this model, I've drilled a hole into the wrist section - about 2mm deep.

Test fit the paperclip before using glue
After dry fitting the paperclip to check depth, I dabbed a drop of Zap medium CA Glue to the exposed hole (I know - it's superglue, but this way it works) and inserted the paperclip.

Leave the whole clip - it's easier to handle than a 4mm length - cut it later.
While this dries, drill a hole in the arm section of the body piece. On a small model like this, it's easy enough to judge where to drill.

On a more complex fit, before you glue a pin into the first hole, paint over the hole with a relatively thick paint. Fit the part and the paint transfers over to its matching point. Drill and continue.

Once you've drilled the matching hole, and the glue holding the pin has dried, cut off about 2mm length and test fit with the target. If it's a good fit, glue and refit. Allow to dry. Fill any gaps with putty/greenstuff and spray with primer.

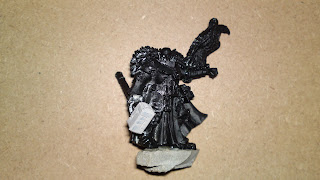
Coteaz primed with cyber eagle, daemon hammer and custom base
That's it for this one.

NB: On larger pieces, you may find a double-pin will stop a piece from rotating while it dries. This is simply a case of drilling 2 holes on each side. Transfer paint as above to figure out placement of matching holes.

Thursday 14 April 2011

Quick guide to inks and washes

Here's a Goblin spear man from my Fantasy 4th Edition.
When I primed this set 15 years ago, I didn't spend any time removing the flash sprue, or mould lines. Shame on me.


He's been primed in white, and I've basecoated the head and limbs in Knarloc Green. I've left the clothes and spear white for the minute, firstly to show the effect of a wash and secondly so I can be quick and sloppy with the strokes. Knarloc Green is one of GW's current range of foundation paints - and is brilliant for coverage and further layering of other colours. The paint is thinned with water on the wet palette and quickly applied. There are 32 of these guys to get through, after all.

Here he is again, this time painted with the old Citadel Orc Flesh Wash.


You can see the difference in the depth of colour and how the pigment settles into crevices. Some drybrush highlights and details is all he really needs. This was brushed straight from the pot, and thinned a little on the model with a wet brush.

You can't buy the 1990s Citadel paints any more. HMG Paints were the original manufacturer and they still make the paints under the Coat D'Arms brand, but with new names.

If you don't want to use GW's Badab Black Wash and then Thraka Green Wash, you could try the new/old Orc Flesh Wash

http://www.azaleanmodels.com/coat-darms--134-ink-wash-green-123-p.asp

£1.80 for an 18ml pot. Bargain.

These guys need the ink wash treatment now.


Taking Care of your Paint Brushes

Paint Brush Care
Boring topic, I'm afraid, but if you don't look after them well enough, you'll end up spending more on hairy pencils than on lumps of the bare plastic you want to buy. Inevitably, though, your brushes will get damaged through age and misuse. Recycle - keep them as drybrushes, stirrers and stipplers. 

For everyday mini painting, you'll mostly be using brushes from size 0000 (or 4/0) for fine detail all the way up to 2 or larger for quick coverage of bigger areas.
Their construction is the same.

The bristles - usually made of hair or some rubbish synthetic - are held in place by a metal collar called a Ferrule. This is important. The interaction of your ferrule with the bristles governs how long the brush will survive. It's made of a thin, cheap metal - don't kid yourself, it's not titanium - and if it's mistreated, your brush will quickly become a paint stirrer.

If paint gets in and dries inside the ferrule, the bristles will harden as they're stuck together, become brittle and stiff, and fall out. Here's how to not end up with a mangy brush:
  • Don't stir the paint with a good brush. Use a crappy freebie from a beginner's Airfix set - the type that comes with mini-pots of thick, gloopy acrylic.
  • Don't mix paints with a good brush. See above for alternative.
  • When painting, try and wet only the tip (or toe) of the brush. The paint will work it's way to the ferrule, so keep an eye open.
  • Rinse often in water to stop the paint getting to the ferrule. If, for some reason, you're using oils, rinse in turpentine instead. The same goes for alternative acrylic thinners.
  • When drying off excess water or paint, wipe the paper towel in a single direction - from handle to point. Try and shape the bristles as you wipe.
  • Don't scrub with the brush - this will kink the bristles at the heel and deform the shape.
  • Wash your brush well after a session. I mean with soap, and until the last bit of acrylic paint comes out. If you allow even a little bit of paint to dry near the ferrule each time, it won't take many sessions before enough has gunged up the brush enough to kill it.
  • Don't use hot water to wash your brush. Sorry. Maybe I should have mentioned this earlier. The heat will expand the ferrule's metal structure, soften the glue holding the bristles and drop or deform your bristles.
  • Always reshape your brush - and always to its original pointed or flat form. Do this when drying on paper towel.
  • Store your brushes upright or flat. If you soak or store them with their weight on the bristles, you might as well go straight back to the shop and buy another set. If you need to soak the brush to give an extra clean, make sure it's suspended somehow.

The rules change a little for stipple brushes and drybrushes. You still need to store them properly and clean them thoroughly, to promote longevity, but the painting techniques you use are naturally abusive to the bristles. This is why many fine brushes are promoted to drybrush status in their twilight years.

These are the basics. We all break the rules from time to time, and often we get away with it. However, that's no reason to develop bad habits.

Any comments? Any tips for fixing brush care mistakes? Please post below.

I'm about to try a fabric softener/hair conditioner soak on a new brush that was given to me splayed. It may persuade it back into shape.

Brush on right was never pointed. Can it be saved?

Tuesday 12 April 2011

Warhammer 4th Edition (Introduction)

Warhammer 4th EditionLoosely Organised TroopsHigh Elf ArcherHigh Elf SpearmanNight Gobin ArchersLet the speed painting begin
Warhammer 4th Edition, a set on Flickr.
Via Flickr:
Found this and a bunch of old metal boxes and blisters in the loft last week. Already primed (in white for some reason), so ready to paint.

HIgh Elves - 20 archers
High Elves - 20 spearmen
Goblins - 32 spearmen
Night Goblins - 32 archers

I'll post updates on this, as well as tips on speed painting and quick army basing.

Saturday 9 April 2011